


In recent weeks we have discussed various fun aspects of New Orleans: the food, music venues, shopping, recreational ideas, tours, volunteerism, festivals, and various neighborhoods. What I haven’t talked to you about yet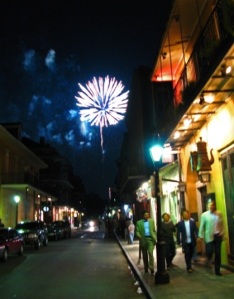 is one of my favorite things: photography! Opportunities for excellent photography abound in the Big Easy. And as an avid amateur photographer, I want to talk to you about getting some great photos in this really cool town.
Whether you’re taking pictures with a small point & shoot, a sophisticated SLR, or your phone’s camera, you’ll have a chance to grab some really good images if you do a little planning. Hmmm…planning, sound familiar? In BCP, planning ahead and thinking about your strategy generally provides you with a better outcome. The same is true with photography. Thinking about the subject of your photograph ahead of time and trying to visualize your intended outcome (and how to get it) will help you to be more successful.
So where to start? In all photographs, light is the most important part of the equation. With no light you have no opportunity to capture an image. However, low light situations yield very dramatic outcomes. Very bright, harsh midday light can be disastrous for a photographer, as it is directly overhead and unkind to the subect. The key to good photography is understanding the direction of the light, the brightness of the light, and the property of the light . For example, early morning and late day light can be warm and soothing; these golden hours yield wonderful photographic outcomes. Whether shooting people, buildings, landscapes, or water scenes, the dramatic light of early and late can help you to achieve powerful images. Shadows are more pronounced at those hours as well. On days that are “cloudy bright,” you will be pretty sure to get good color and no harsh shadows.
So what about shooting people and street musicians in New Orleans? Whenever shooting street scenes, the use of a small amount of “fill” light is always helpful. You have the ability to control the flash on your point and shoot camera – read the manual and figure out how to use the built in flash at half or quarter power to give a little light to a subject, but not so much light that you wash out details. Without a little fill light, the subject may be too dark. When you are shooting night scenes to record the color and excitement of the light and people, simply turn the flash off. Don’t flood the scene with fake light; use existing light to add to the drama of your image. The flash can only travel about 15 feet anyway, so don’t bother with it. To get a good image at night push up your ISO – that’s the numbers that are 100, 200, 400, 800 etc. on the camera. This helps the camera to capture the existing light without struggling. So on a dimly lit, but colorful street in New Orleans at night, push the ISO to at least 400, turn off the flash, lean against a pole or building, and hold the camera steady for a dramatic night shot. Good places for night photography include Bourbon Street, Canal Street, the view of the Mississippi, and bridges from the MoonWalk. If your hotel window has a good view you can get great images from your window. Again turn off the flash (or you will get a cool shot of yourself in the reflection as the flash bounces off the window), turn off all the lights in your room, and steady yourself by leaning hard against the window or wall.
If shooting photos of your favorite meal, you can shoot with the flash at one-third power or your plate of food will be way overexposed and look not quite so delicious. Many cameras do have auto modes, program mode, and manual modes. Get familiar with how your camera behaves in each of these modes. Experiment by taking many photos; photo cards are inexpensive and hold potentially thousands of images. Don’t be bashful, and take lots of shots.
What about people photos? How do you get people to look natural and not frozen in front of your camera? First, engage them in conversation before you take the photo. Make them feel comfortable with you. Tell them you will be taking a few images to capture different expressions, and then do it. In daylight use a little fill flash, in darkness use a little more flash. And when you take the posed photo, count it down out loud – “One, two three” – but shoot at two. People expect it at three, and stiffen up a bit, so shoot at two…just my suggestion.
To get some interesting images of the city, take a ride on the streetcar or horse-drawn carriage or walk through one of the cemeteries. If shooting photos inside a cathedral or museum, be mindful of where you are, push up your ISO, and
turn off your flash.
Taking photos of musicians can be fun, and they’re usually agreeable to being photographed. Zoom in close and get the interesting faces. Be aware that some people you see in New Orleans (although interesting characters) may not want to be photographed. I have experienced this more than once, and in those cases I simply turned my camera to the ground and walked away.
Now that you have taken photos of the food you were eating, the musicians you were enjoying, the sites you were seeing, the fun you were having, it’s time to turn your attention to the post photo processing with your favorite PhotoShop-like tool to touch them up a bit and then have fun sharing them with friends and family.
Of course this was just a few short tips for being successful with your photos. There are many great photo instructional work-shops on the web; explore them. And let me see some of your work!
All the best,
Clyde Berger
DRI International Foundation
Director of Volunteerism